
Published April 20, 2020
Teaching Tuesdays: Pinewood Derby
The Indiana State Museum and Historic Sites may be currently closed due to COVID-19 – but that doesn’t mean we can’t bring some of the museum to you!
On Tuesdays, we’re bringing families tons of educational content that’s easy for caregivers and their kids to do at home with materials you likely have on hand.
Today, we’re taking a look at how you can do one of our favorite events right in your own home: Pinewood Derby!
For this activity, you’ll make your own car out of materials you may already have on hand, along with a track for your car. Then, see how fast your car can fly down the track by changing the design of the car or incline of the track.
MATERIALS FOR CAR
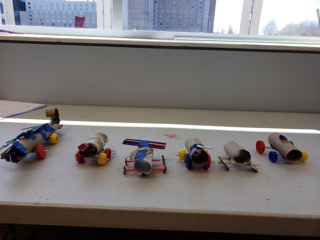
Be creative! Use what you have around the house. The pictures below are just one way you can create a car.
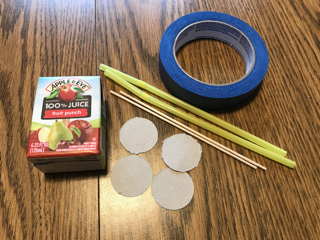
BODY OF THE CAR (choose one)
- Empty Juice Box
- Cardboard
- Clothespin
- Toilet Paper Roll
- Water Bottle
- Pink Eraser
WHEELS & AXELS
- Bottle Caps
- Buttons
- Cardboard Circles
- Toothpicks
- Skewers
- Dowel Rods
- Straws
OTHER MATERIALS
- Scissors
- Hot Glue Gun
- Glue
- Markers
- Crayons
- Pencils
- Colored Pencils
- Twist Ties
- Tape
- Construction Paper
INSTRUCTIONS FOR CAR
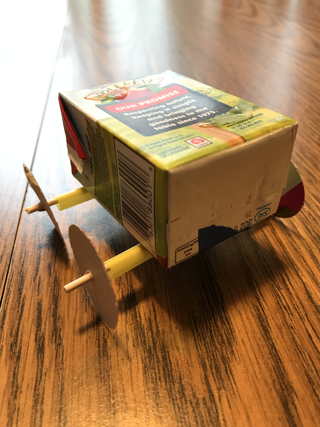
1. Choose the body for your car from the list above, or use something else entirely! Then, decorate it however you’d like.
2. To begin creating the axles, cut two straw segments so that they exceed ½ inch past the body of your car.
3. Use tape or glue to attach the straws to the base of your car. The straws will allow your car’s wheels and axles to spin!
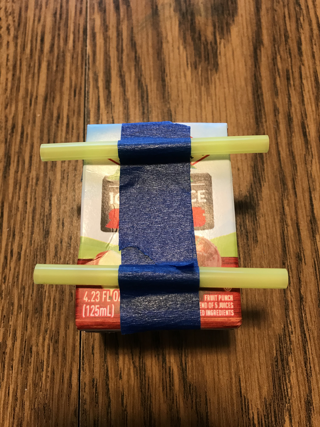
4. Cut the dowel rod down so that the rod is longer than the straw segments by 1 inch. ½ inch of the rod will stick out from each straw.
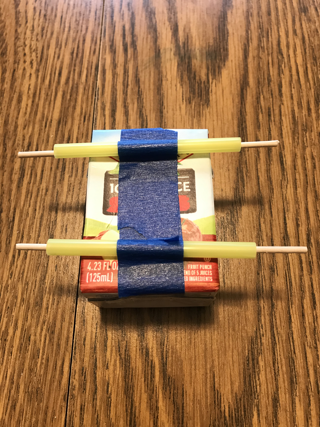
5. Have an adult use a hot glue gun to secure your wheels (buttons, bottle caps, cardboard circles) to the dowel rods. Don’t forget to glue them together after the dowel rods are through the straws. If you don’t have a hot glue gun, you can also use wood glue or another strong adhesive.
6. That’s it! Now, let’s work on our Pinewood race track.
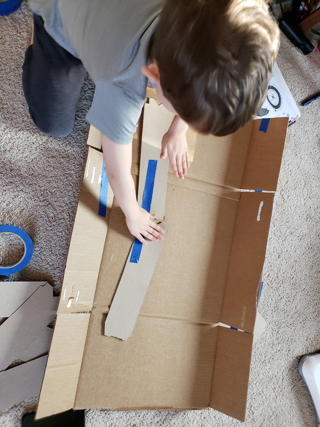
MATERIALS FOR TRACK
- Cardboard
- Duct tape/painter tape
- An X-Acto knife/scissors
- Markers
INSTRUCTIONS FOR TRACK
1. Find a long piece of cardboard for your track. You may have to reinforce the back if there are creases in the cardboard.
2. You will need lanes and side bars to make sure your Pinewood car doesn’t crash into its opponent, or fall off the track! You can use more cardboard for this. Tape the sidebars into place so they stand up from your track.
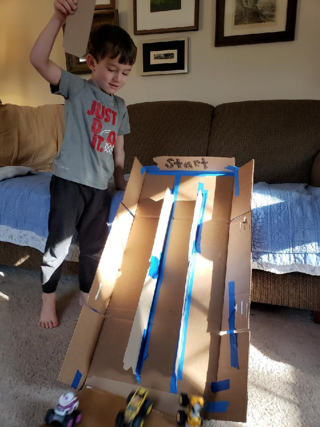
3. Write “Start” and “Finish” on pieces of paper, then tape onto the top and bottom of your track.
4. You will need another short strip of cardboard for your “Start” line. This is where your cars will rest until you’re ready to race. You can use more cardboard for this. Just pull it out to see your cars zoom to the finish line!
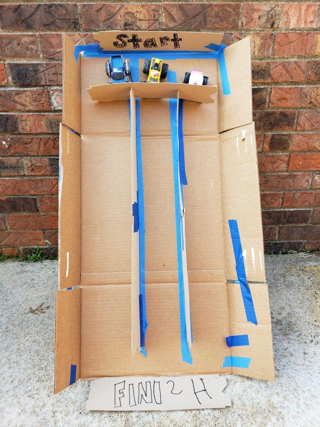
5. You can adjust the track’s incline to make your cars go faster or slower.
BONUS
For those with younger children, all you need is a track! Just use toy cars that your child already has. You can also tape an outline of a track on the floor, add start and finish lines, and have your child drive their toy car along it.
TIPS FOR PARENTS
During and after the activity, ask your child:
- What was challenging about this activity?
- What worked about your design? What didn’t work?
- How can we make the car or track function better?
- How can we get your car to go faster?
READY TO CONTINUE EXPLORING?
Perfect your car at home, and get excited to join us next year when you can put your car to the test on our two-story track.